A Few Words Before We Begin
If you are following along you will notice that the title of this series is updated to reflect Windows 10 and Monogame 3.4.
Don’t worry! All of the code we have written and the projects we created will run just fine on Windows 8, 8.1, or 10 if you are working in Visual Studio 2010 or 2013 and have installed the XNA Game Studio 4.0. If that is your situation skip the next couple of paragraphs.
However, for those of you that are ready to put the past behind you and completely sever the cord with the Microsoft XNA framework or you are brand new to game development and Monogame then the following steps walk you through creating a new MonoGame project for Windows 10. I also provide a quick outline for using the MonoGame content pipeline to add graphics, sound, and effects to your games.
Creating a New Windows 10 MonoGame UAP Project
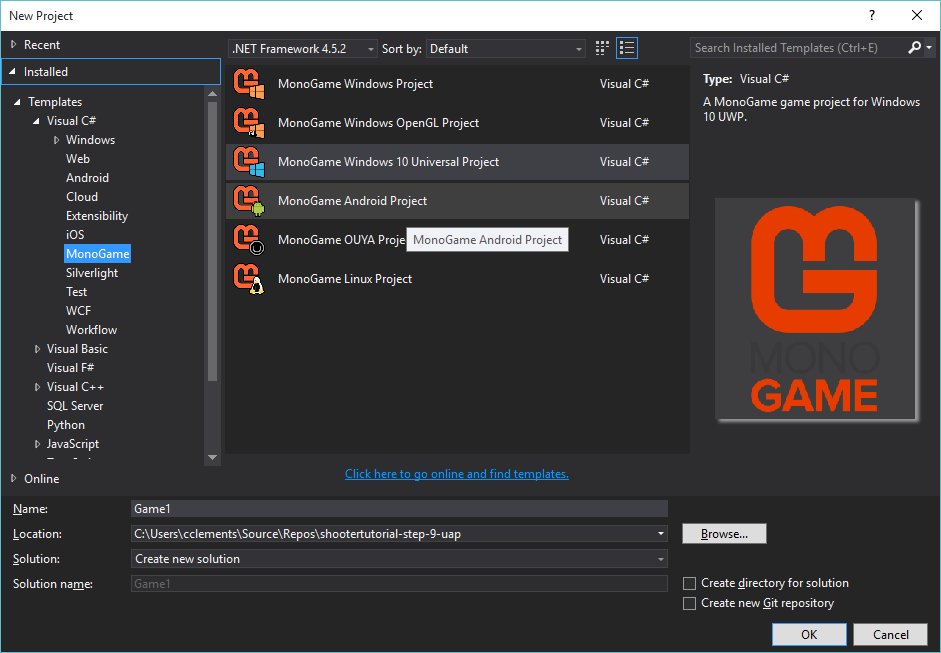
Let's get started! First we want to create a new Windows 10 UAP MonoGame project.
Step 1.) Open Visual Studio and select File->New Project. Call it "ShooterTutorial-step-9-uap".
Step 2) Copy in the source code from previous tutorials.

In this tutorial we will reuse the png files used previous installments of the series. This should help to illustrate the point that the everything both source and content can be copied and pasted into a MonoGame project directly from an XNA project.
Or you could just fork my Windows 10 UAP app here from here and skip all the details.
Note: The repository linked above is a Git repository not HG as used in the past.
If you are following along you will notice that the title of this series is updated to reflect Windows 10 and Monogame 3.4.
Don’t worry! All of the code we have written and the projects we created will run just fine on Windows 8, 8.1, or 10 if you are working in Visual Studio 2010 or 2013 and have installed the XNA Game Studio 4.0. If that is your situation skip the next couple of paragraphs.
However, for those of you that are ready to put the past behind you and completely sever the cord with the Microsoft XNA framework or you are brand new to game development and Monogame then the following steps walk you through creating a new MonoGame project for Windows 10. I also provide a quick outline for using the MonoGame content pipeline to add graphics, sound, and effects to your games.
Creating a New Windows 10 MonoGame UAP Project
Let's get started! First we want to create a new Windows 10 UAP MonoGame project.
Step 1.) Open Visual Studio and select File->New Project. Call it "ShooterTutorial-step-9-uap".
Step 2) Copy in the source code from previous tutorials.
In this tutorial we will reuse the png files used previous installments of the series. This should help to illustrate the point that the everything both source and content can be copied and pasted into a MonoGame project directly from an XNA project.
Or you could just fork my Windows 10 UAP app here from here and skip all the details.
Note: The repository linked above is a Git repository not HG as used in the past.
Now, where was I?
Ah yes I remember, sound, music and explosions. In this blog post we will expand our game project to add game music and sound effects. Music and sound can greatly improve the immersion and set the mood of your game. Game sounds can be nearly as important to your game as graphics. How bland would Mario Brothers be if there were no sound associated with picking coins? Sounds may become game play elements in and of themselves. Imagine your game character being a dark room and footsteps approaching from behind?
Ah yes I remember, sound, music and explosions. In this blog post we will expand our game project to add game music and sound effects. Music and sound can greatly improve the immersion and set the mood of your game. Game sounds can be nearly as important to your game as graphics. How bland would Mario Brothers be if there were no sound associated with picking coins? Sounds may become game play elements in and of themselves. Imagine your game character being a dark room and footsteps approaching from behind?
Add the Content Files
to Our Project
Our first order of business will be to add the sound game
music and sound effect contents to our project.
Start by creating a new folder in the project
called Sounds. I typically locate this folder below the Content folder that appears in our new MonoGame Windows 10 UAP solution. Next copy in the gameMusic.mp3,
laserfire.wav, and explosion.wav files into the Sounds folder.

Next launch the MonoGame Content PipeLine Tool by double clicking the Content.mgcb file in the solution explorer. You may be prompted about which application to use to open the file type. If you are prompted, brows to the pipeline.exe file located in the directory where you installed Monogame. It should similar to this C:\Program Files (x86)\MSBuild\MonoGame\v3.0\Tools\Pipeline.exe.
To add content to the Monogame Content Pipeline tool right-click on "Content" and click "Add". Now browse to existing images, models, sounds, or effects you want to add and click "open".
If you have done everything correctly your pipeline tool should look like this:


If all goes well the content tool should your content files will build with no errors and your content will be ready to use in your game projects.
Consuming our Sound Resources
First, let's add a sound that represents the discharge of our ship's laser cannon. XNA/Mongame provides two class for working with sound effects; SoundEffect and SoundEffectInstance. Let's add variables for each to our class.
//Our Laser Sound and Instance
private SoundEffect laserSound;
private SoundEffectInstance laserSoundInstance;
Next, we need to load the sound from our compiled content file into the soundEffect class. Loading sounds isn't much different from loading images. We will use the contentmanager class and load the sound in the LoadContent Method of the main game class. Add the following line of code to the LoadContent method.
// Load the laserSound Effect and create the effect Instance
laserSound = Content.Load<SoundEffect>("Sounds\\laserFire");
Once we have the laserSound class populated with sound data we need to create an instance of the sound effect. We can do that using the CreateInstance mthod on the SoundEffect class. Add this last line just below the one above in the LoadContent method.
laserSoundInstance = laserSound.CreateInstance();
Now for the fun bit! I decided to add this last snippet of code to the method we call when the user presses the fire button. This method is appropriately named "FireLaser".
Add this line of code inside of the "if" constrains our rate of fire by check the elasped time since the last time the fire button was pressed. Here is the entire code block as reference.
// govern the rate of fire for our lasers
if (gameTime.TotalGameTime - previousLaserSpawnTime > laserSpawnTime)
{
previousLaserSpawnTime = gameTime.TotalGameTime;
// Add the laer to our list.
AddLaser();
// Play the laser sound!
laserSoundInstance.Play();
}
Time to test! If everything is correct then you should hear a distinct "ziiiip!" when you press the fire button (space bar). This sound should occur at the same rate as the laser image appears on the screen. The sound should not play any faster than the actual ship is firing. In short, the sound is constrained to the rate of fire.
If you made it this far, then I assume the laser sound is working as you would expect. Now let's add the explosion sound. All of the steps are the same so this time I will breeze through it.
First, add the two variables we need to hold and play the explosion sound. Remember these variables are members of the Game class.
//Our Explosion Sound.
private SoundEffect explosionSound;
private SoundEffectInstance explosionSoundInstance;
Next, load the sound effect in the LoadContent method and instantiate the SoundEffectInstance class.
// Load the laserSound Effect and create the effect Instance
explosionSound = Content.Load<SoundEffect>("Sounds\\explosion");
explosionSoundInstance = explosionSound.CreateInstance();
Finally, let's play the explosion sound when we add a new explosion to the game. Add the following code to the AddExplosion method.
/* play the explosion sound. */
explosionSoundInstance.Play();
If you run the game you will find the explosion sound is played either when a laser blast or the player's ship collides with an aerial mine.
You may also notice the only one instance of the explosion sound is played at a time. This means that if you were to destroy two targets in in rapid succession you may find that you only hear the explosion sound once. Let's alter our code to play the sound from the SoundEffect class rather then the SoundEffectInstance class.
Change the line above to:
explosionSound.Play();
Remember to clean up the SoundEffectInstance classes with a dispose method when you are done. This can be done when exiting the game or perhaps moving between screens when a given sound is no longer needed.
I added the following code the UnloadContent method.
laserSoundInstance.Dispose();
explosionSoundInstance.Dispose();
Adding Game Music
I will wrap up this installment of the tutorial by adding game music to our demo. The steps for adding game music are similar to those for adding other types of content. However, the playback makes use of the Song class and the MediaPlayer class.
First declare a variable that will hold our game music. Add this line of code the Game class.
// Game Music.
private Song gameMusic;
Next add the following line of code to the LoadContent method.
// Load the game music
gameMusic = Content.Load<Song>("Sounds\\gameMusic");
Lastly, let's kick off the playback of our game music by using the MediaPlayer class. You can start the playback with this line of code, again, in the LoadContent method.
// Start playing the music.
MediaPlayer.Play(gameMusic);
When you want to stop the music you can call the stop method like this:
MedialPlayer.Stop();
Conclusion
Today we learned how to convert our Windows 7/8.1 based game projects to Windows 10 UAP projects. We also learned how to use the MonoGame Content Pipeline tool to completely remove the dependence on XNA.
We also learned how to add cool sound effects and music play back to our games. Of course this tutorial only scratches the surface. There is a lot more ground to cover when it comes to sounds such as adjusting pitch, tone, volume, and of course 3D effects. Next time we will add a GameState class and create menus to navigate to and from. Thanks for reading and following along!
As always, you can find the complete source code for this tutorial here.
Chris

Next launch the MonoGame Content PipeLine Tool by double clicking the Content.mgcb file in the solution explorer. You may be prompted about which application to use to open the file type. If you are prompted, brows to the pipeline.exe file located in the directory where you installed Monogame. It should similar to this C:\Program Files (x86)\MSBuild\MonoGame\v3.0\Tools\Pipeline.exe.
To add content to the Monogame Content Pipeline tool right-click on "Content" and click "Add". Now browse to existing images, models, sounds, or effects you want to add and click "open".

The next step is to save the content project and attempt to compile your assets. On the Build menu select "build". The content tool will attempt to build all assets; images, sounds, and models. There is no need to build each type individually.

If all goes well the content tool should your content files will build with no errors and your content will be ready to use in your game projects.
Consuming our Sound Resources
First, let's add a sound that represents the discharge of our ship's laser cannon. XNA/Mongame provides two class for working with sound effects; SoundEffect and SoundEffectInstance. Let's add variables for each to our class.
//Our Laser Sound and Instance
private SoundEffect laserSound;
private SoundEffectInstance laserSoundInstance;
Next, we need to load the sound from our compiled content file into the soundEffect class. Loading sounds isn't much different from loading images. We will use the contentmanager class and load the sound in the LoadContent Method of the main game class. Add the following line of code to the LoadContent method.
// Load the laserSound Effect and create the effect Instance
laserSound = Content.Load<SoundEffect>("Sounds\\laserFire");
Once we have the laserSound class populated with sound data we need to create an instance of the sound effect. We can do that using the CreateInstance mthod on the SoundEffect class. Add this last line just below the one above in the LoadContent method.
laserSoundInstance = laserSound.CreateInstance();
Now for the fun bit! I decided to add this last snippet of code to the method we call when the user presses the fire button. This method is appropriately named "FireLaser".
Add this line of code inside of the "if" constrains our rate of fire by check the elasped time since the last time the fire button was pressed. Here is the entire code block as reference.
// govern the rate of fire for our lasers
if (gameTime.TotalGameTime - previousLaserSpawnTime > laserSpawnTime)
{
previousLaserSpawnTime = gameTime.TotalGameTime;
// Add the laer to our list.
AddLaser();
// Play the laser sound!
laserSoundInstance.Play();
}
Time to test! If everything is correct then you should hear a distinct "ziiiip!" when you press the fire button (space bar). This sound should occur at the same rate as the laser image appears on the screen. The sound should not play any faster than the actual ship is firing. In short, the sound is constrained to the rate of fire.
If you made it this far, then I assume the laser sound is working as you would expect. Now let's add the explosion sound. All of the steps are the same so this time I will breeze through it.
First, add the two variables we need to hold and play the explosion sound. Remember these variables are members of the Game class.
//Our Explosion Sound.
private SoundEffect explosionSound;
private SoundEffectInstance explosionSoundInstance;
Next, load the sound effect in the LoadContent method and instantiate the SoundEffectInstance class.
// Load the laserSound Effect and create the effect Instance
explosionSound = Content.Load<SoundEffect>("Sounds\\explosion");
explosionSoundInstance = explosionSound.CreateInstance();
Finally, let's play the explosion sound when we add a new explosion to the game. Add the following code to the AddExplosion method.
/* play the explosion sound. */
explosionSoundInstance.Play();
If you run the game you will find the explosion sound is played either when a laser blast or the player's ship collides with an aerial mine.
You may also notice the only one instance of the explosion sound is played at a time. This means that if you were to destroy two targets in in rapid succession you may find that you only hear the explosion sound once. Let's alter our code to play the sound from the SoundEffect class rather then the SoundEffectInstance class.
Change the line above to:
explosionSound.Play();
Remember to clean up the SoundEffectInstance classes with a dispose method when you are done. This can be done when exiting the game or perhaps moving between screens when a given sound is no longer needed.
I added the following code the UnloadContent method.
laserSoundInstance.Dispose();
explosionSoundInstance.Dispose();
Adding Game Music
I will wrap up this installment of the tutorial by adding game music to our demo. The steps for adding game music are similar to those for adding other types of content. However, the playback makes use of the Song class and the MediaPlayer class.
First declare a variable that will hold our game music. Add this line of code the Game class.
// Game Music.
private Song gameMusic;
Next add the following line of code to the LoadContent method.
// Load the game music
gameMusic = Content.Load<Song>("Sounds\\gameMusic");
Lastly, let's kick off the playback of our game music by using the MediaPlayer class. You can start the playback with this line of code, again, in the LoadContent method.
// Start playing the music.
MediaPlayer.Play(gameMusic);
When you want to stop the music you can call the stop method like this:
MedialPlayer.Stop();
Conclusion
Today we learned how to convert our Windows 7/8.1 based game projects to Windows 10 UAP projects. We also learned how to use the MonoGame Content Pipeline tool to completely remove the dependence on XNA.
We also learned how to add cool sound effects and music play back to our games. Of course this tutorial only scratches the surface. There is a lot more ground to cover when it comes to sounds such as adjusting pitch, tone, volume, and of course 3D effects. Next time we will add a GameState class and create menus to navigate to and from. Thanks for reading and following along!
As always, you can find the complete source code for this tutorial here.
Chris
Great as always.
ReplyDeleteCan't wait for the next part.
This comment has been removed by the author.
ReplyDeleteThanks! I'm already working on the next installment.
ReplyDelete<3
ReplyDeleteI loved Tara tutorials, then you came to continue and i loved your tutorials :)
Thanks for all the support you are doing for newcomers and dreamers :)
I did all the steps but are not running sound effects, I'm working in VS 2013, the background music is working correctly
ReplyDeleteI love this tutorial, cannot wait for the next bit
ReplyDeleteI can not find the player.xnb graphic...where did you guys download it from?
ReplyDelete